You are here: 12. Micronet ECOM > 12.12. Admin > 12.12.1. Adding Users

Adding Users


Technical Tip

As well as the procedure described below, you can create a new user by:

To create a new Micronet ECOM user:

  1. Display the Admin screen.

Refer to "Admin".

  1. Select the Add New User button.

Micronet displays a New User panel at the left of the Admin screen.

  1. Complete the following fields:


Field

Value


User ID

Enter a unique ID for the user. Micronet checks that this user ID does not exist before allowing you to continue.


Name

Enter the user's full name for identification purposes.


Password

Enter a password for the user. Passwords must be at least six characters long.


Email

Enter the user’s email address for sending web order confirmations.


Phone

Enter the user's phone number.


Mobile Phone

Enter the user's mobile phone number. The format of the number will be validated when the user details are saved, i.e. it must start with 04, have 10 digits and no spaces.

If Micronet ECOM is set up for two-factor authentication, it will only work if the user's mobile number is valid.


Warehouse

Select the user's default warehouse from the list.


Salesforce Code

The Salesforce feature allows a single user to access a Micronet ECOM site using multiple debtor accounts. It is designed for salespeople who place sales orders for different customers and then manage the sales process. It allows a salesperson to log in to Micronet ECOM and then switch between customer accounts to create orders, view order statuses, view account history and process payments, all without having to logout.

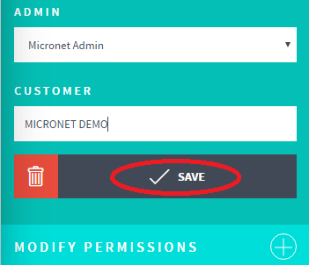
Select the user's default salesperson.

Note that this field is only enabled for users where the Admin field is set to either All Users or Micronet Admin.


Reference

For more information, see "Appendix 2: Salesforce Feature".


Admin

Assign a level of security to the user:

  • My User – Minimum rights / access, the lowest level of security. These users can only view their own user ID.
  • Customer Users – Customer administrator. These users can view and maintain the user IDs of all users for a selected customer.
  • All Users – Site administrator. These users can view and maintain the user IDs of all users for the online store.
  • Micronet Admin – All rights / access, the highest level of security. These users can view and maintain the user IDs of all users, including customer and site administrators. They can also view all debtors in a Micronet ECOM system – "Logging in to Micronet ECOM".


Customer

Select the customer code from Micronet. If there is a large number of codes, you can also select this field then type in a code to display all codes starting from that code.

  1. When you have finished entering the user details, select the Save button.

Micronet saves the user and adds them to the list.

  1. Select the + button next to Modify Permissions to display further user options.

  1. Complete the following fields:


Field

Value


Favourites

Tick this box to make the Favourites button on the navigation bar available to this user. Otherwise, leave it unticked.


View orders

Tick this box to make the View Orders button on the navigation bar available to this user. Otherwise, leave it unticked.


My account

Tick this box to make the My Account button on the navigation bar available to this user. Otherwise, leave it unticked.


Quick add

Tick this box to make the Quick Add button on the navigation bar available to this user. Otherwise, leave it unticked.


Edit user

This box is only visible to users who have their Admin field set to either All Users or Micronet Admin.

Tick this box to allow this user to maintain their own users. Otherwise, leave it unticked.


Checkout

Tick this box to allow the user to get to the Checkout screen.

If a user does not have this box ticked, they can add items to the shopping cart but they cannot proceed to the In your cart screen. When they select the shopping cart to complete their order, there is no Checkout button at the bottom of the shopping cart panel.

Without Checkout access

With Checkout access


Enable Purchasing

If you want the user to be able to save orders but not submit them, tick the Checkout box but don't tick the Enable Purchasing box. This allows the user to hold orders and create templates.

If you want the user to be able to both save orders and submit them, tick both the Checkout and Enable Purchasing boxes.


Hide Category Tree

Tick this box if you want to hide the category tree for this user. You can also untick the box to show the category tree again.

This option is only available if the user has the Edit User check box ticked, they are assigned to the same debtor as you and have a security level equal to or lower than your own.


Reset Password

Tick this box to prompt the user for a new password on their next login.


Hide Special Pricing

Tick this box to hide special pricing (i.e. recommended retail prices) from this user.

Note that this only has an effect when recommended retail prices are being displayed.


Hide Global Pricing

Tick this box if you don't want the user to be able to see prices anywhere on the ECOM site. This removes the Price column from the grid or list when placing an order, and from the Checkout screen. The user will be able to place an order but will not know the order value.

Note that this does not remove pricing when the user views their order history so if you don't want this user to be able to see those prices, you need to disable the View Orders option for them too.


Show Alt Part No

If alternate part numbers have been enabled, tick this box if you want this user to be able to view and search on alternate part numbers on the Order Entry screen. Otherwise, leave it unticked.


Catalogue

Tick this box to make the Catalogue button on the navigation bar available to this user. Otherwise, leave it unticked.


Technical Tip

The Catalogue option is user configurable. Depending on your website configuration, this option may have a different name both in the navigation bar and on this screen.

For information about setting up this menu option, see "Catalogue" earlier in this manual.

  1. Select Save Changes to save the user's permissions.